
In today’s guide, we will explore how to plant those blueberries you can find at the grocery store in two super easy ways. The key difference between these methods lies in the number of seeds we can germinate. While both approaches will yield thriving plants, it’s essential to remember that the fewer competitors the seeds have at birth, the more successful plants we’ll harvest. In both methods, we aim for the largest blueberries available, as they will provide the best seeds. We’ll go through each step in detail to ensure your blueberry plants flourish.
Method 1: Seed Extraction with Pulp


- Selecting the Best Blueberries: Begin by picking out the largest blueberries you can find at the store. While they may not be very large, these berries will serve as the foundation for your future plants.
- Extracting the Seeds: To extract the seeds, cut the blueberries open and remove the pulp carefully. This process will provide us with clean seeds ready for planting.
- Preparing for Competition: In this method, we’ll create a competitive environment for the seeds, mainly involving fungi. To do this, add a generous amount of water to the container, filling it to about the middle. The goal is to create a moist environment for the seeds to sprout.
- Allowing Separation: Allow the container to sit for a while, allowing the heavier seeds to sink to the bottom. At this point, we will begin extracting the sap that forms, along with some remaining pulp. The seeds will be left behind.
- Separating Pulp from Seeds: Continue rinsing the pulp away, leaving only the tiny seeds behind. The remaining pulp contains sugars that attract fungi, which will compete with the blueberry seeds during germination.
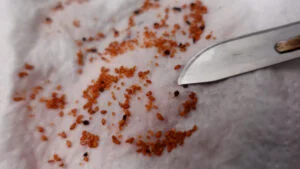
- Drying the Seeds: Place the cleaned seeds on a paper napkin to dry. Once thoroughly dried and cleaned, these seeds can be stored for up to a month before planting.
Method 2: Direct Planting of Seeds


- Selecting and Preparing the Soil: Choose a container with a lid for this method. Use well-composted soil, ensuring it’s loose and well-aerated. Adequate ventilation is essential for the roots when the tiny plants start to germinate.
- Planting the Seeds: Spread the seeds evenly over the soil surface. Be mindful of seed size variations, separating the larger seeds if necessary. This step allows you to have better control over plant selection from the start.
- Creating Humidity: Sprinkle water over the seeds gently, ensuring that the soil remains moist but not saturated. Cover the container to maintain humidity, which aids in the germination process.
- Providing Light and Warmth: Place the container in a well-lit and warm area inside your home. Adequate light is crucial for germination, and warmth accelerates the growth process.


