
Embarking on the journey of vermicomposting is not only an excellent way to recycle kitchen waste but also a great method to produce nutrient-rich compost for your garden. In this guide, we’ll explore a simple yet effective way to create your own vermicomposter using a three-tote system.
Materials Needed:
- Three durable plastic totes (preferably Roughneck brand for their durability)
- One lid for the totes
- A cooler drain or similar item for drainage
- Drill with a quarter-inch bit
- Bricks or blocks for elevation
Step-by-Step Guide:
1. Preparation of Totes:
Start by drilling quarter-inch holes across the bottom of two totes. These holes are crucial for allowing worms to move between layers and for drainage.
Additionally, drill holes around the upper edges of these totes to provide adequate aeration.
2. Setting Up the Drainage System:
The bottom tote will act as your drainage collector. Here, you will need to install the cooler drain. Make sure to place it on the recessed side of the tote for effective drainage.
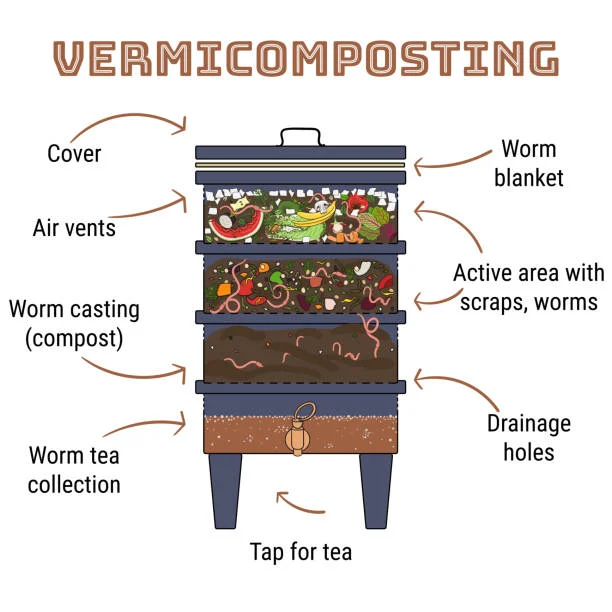
The drilled holes will allow excess liquid, also known as ‘worm tea’, to drain out, which can be used as a nutrient-rich liquid fertilizer.
3. Assembling the Vermicomposter:
Stack the two drilled totes above the drainage tote. These will serve as the living quarters for your worms and the composting area.
The worms and compost material will go into the top tote initially.
4. Transferring the Worms:
Carefully transfer your worms into the top tote, along with their current bedding and food scraps.
As the top tote gets filled with worm castings, shift it to the middle, making the newly top tote the active composting layer.
5. Maintenance and Harvesting:
Continue adding kitchen scraps and bedding to the new top layer. The worms will migrate upwards towards the new food source, leaving behind rich compost in the lower tote.
Once a tote is full of castings and devoid of worms, it can be emptied into your garden.
Regularly check the bottom tote for worm tea and use it as a liquid fertilizer in your garden.
6. Elevating the System:
Raise the entire setup on bricks or blocks. This elevation helps in easier drainage and accessibility.
Creating a homemade vermicomposter is a rewarding endeavor. This three-tote system is efficient, cost-effective, and an excellent way to contribute to a sustainable environment. As you get accustomed to the process, feel free to experiment and adapt the system to suit your needs. Happy composting, and enjoy the benefits of rich, organic compost for your garden!


