
Effective watering is a fundamental aspect of successful gardening, whether you’re nurturing a small flower bed or planting a young tree. One innovative and eco-friendly technique is to use a PVC pipe with strategically placed holes to deliver water directly to a plant’s roots. This method ensures that your plants receive the right amount of water where it’s needed most, promoting healthier growth and conserving water. In this article, we will guide you through the process of setting up a PVC watering system for both small and large plants.
- PVC Pipe: Select a piece of PVC pipe that matches the size of your plant or tree. For smaller plants, ½ inch to 1-inch diameter PVC pipes work well, while for larger trees, consider using 2-inch or larger pipes.
- Gravel or Small Stones: This is used to fill the PVC pipe and ensure water distribution.
- Saw: To cut the PVC pipe to the desired length.
- Drill and Drill Bits: To create holes in the PVC pipe for water distribution.
- Geotextile Fabric: Optional but recommended to prevent clogs and keep the pipe clean.
- Water Source: A hose or watering can.
- Plants or Trees: The species of your choice, suitable for your gardening project.
Steps to Create Your PVC Watering System
- Measure and Cut the PVC Pipe: Determine the appropriate length of PVC pipe for your plant’s root depth. For small plants, a 12-18 inch pipe is usually sufficient, while for larger trees, it may range from 2 to 3 feet. Cut the PVC pipe to the desired length using a saw.
- Drill Holes: Create evenly spaced holes along the length of the PVC pipe. The number and size of holes will depend on the plant’s size and water requirements. For smaller plants, 1/16 to 1/8 inch holes every 6-8 inches may suffice, while larger trees may need larger holes.
- Place Geotextile Fabric (Optional): Wrapping a piece of geotextile fabric around the bottom of the pipe can help prevent clogs and keep the pipe clean. Secure it with a tie or adhesive.
- Fill the Pipe with Gravel: Fill the PVC pipe with small stones or gravel to a height just below the lowest hole. This layer of material will help distribute water evenly around the roots and prevent soil from entering the pipe.
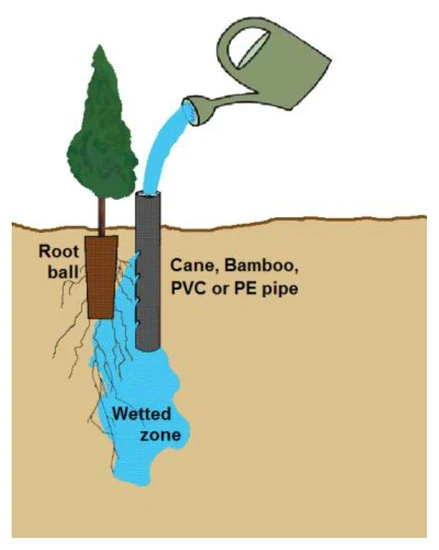
- Position the PVC Pipe: Dig a hole next to your plant or tree, deep enough to accommodate the pipe. Ensure that the top of the pipe is slightly above ground level to make watering easier. Position the pipe vertically and gently pack soil around it to hold it in place.
- Watering: Water your plants by pouring water into the PVC pipe. The water will seep through the holes and reach the root zone directly, ensuring efficient and deep watering.
Benefits of the PVC Watering Technique
- Water Efficiency: This technique ensures that water goes directly to the roots, reducing wastage and promoting water conservation.
- Healthier Plants: Plants receive consistent and targeted watering, which leads to stronger and healthier growth.
- Time-Saving: It’s a low-maintenance method that requires less time and effort than traditional watering.
- Versatility: This technique can be used for a wide range of plants, from small flowers to large trees, making it suitable for all your gardening needs.
The PVC watering technique is a cost-effective and efficient way to ensure your plants receive the right amount of water while minimizing water waste. Whether you’re tending to a small flower garden or planting a substantial tree, this method can be adapted to suit your specific needs. By using PVC pipes and gravel, you can create a simple yet highly effective watering system that contributes to the success of your gardening projects. Start using this method today and watch your plants thrive.


")


